快速判断
- 01这个 Skill 是干嘛的
- 为个人文件、记录和数字资料建立索引,并通过统一入口检索回忆。
- 02它能解决什么问题
- 解决资料散落在不同位置、记得内容却找不到原文件和长期记忆断裂的问题。
- 03它适合谁来用
- 适合拥有大量个人数字资料、希望建立本地检索与回忆系统的人。

预览 · README.md
中文为 README 译文;English 保留 GitHub README 原文。
<div align="center"> <img src="web/public/logos/pensieve_logo_512.png" width="250"/> </div>


我对名字进行了调整,因为 Memos 这个名字已经被其他人注册了,所以改成了 Pensieve。
Pensieve(原 Memos)
Pensieve 是一个专注于隐私的被动记录项目。它可以自动记录屏幕内容,构建智能索引,并提供便捷的 web 界面来检索历史记录。
这个项目主要参考了另外两个项目,一个叫做 Rewind,另一个叫做 Windows Recall。不过,与它们不同的是 Pensieve 让你可以完全管控自己的数据,避免将数据传递到不信任的数据中心。
功能特性
- 🚀 安装简单,只需要通过 pip 安装依赖就可以开始使用了
- 🔒 数据全掌控,所有数据都存储在本地,可以完全本地化运行,数据处理完全由自己控制
- 🔍 支持全文检索和向量检索
- 📊 交互式实体详情视图,支持时间序列上下文导航
- 🌐 智能元数据捕获,包括网页活动的浏览器 URL 获取
- 🤖 支持和 Ollama 一起工作,让 Ollama 作为 Pensieve 的机器学习引擎
- 🌐 支持任何 OpenAI API 兼容的模型(比如 OpenAI, Azure OpenAI,vLLM 等)
- 💻 支持 Mac 和 Windows 系统(Linux 支持正在开发中)
- 🔌 支持通过插件扩展出更多数据处理能力
📰 最新动态
- Pensieve Agent Skill: 从
v0.33.0版本开始,Pensieve 随仓库分发一份 agent skill,让任意支持 Skill 的 AI 工具(Claude Code、Codex、opencode 等)都能用自然语言搜索你的截图归档,并直接跳转到对应的实体详情页。详情参见 使用 Agent Skill 搜索。 - 应用程序黑名单功能: 从
v0.30.0版本开始,Pensieve 引入了应用程序黑名单功能,允许您从截图记录中排除特定应用程序。此功能包括在记录和文件监控过程中的黑名单检查,并在配置面板中增强了黑名单管理界面。 - 增强的实体详情视图: 从
v0.29.0版本开始,Pensieve 引入了全新的实体详情页面,支持交互式上下文导航,让您可以按时间顺序浏览截图,提供更好的视觉上下文和元数据显示。 - 配置管理界面: 从
v0.27.0版本开始,Pensieve 引入了直观的配置管理界面,可通过 Web 端轻松配置所有 Pensieve 设置。
快速开始
[!IMPORTANT] 似乎不是所有版本的 Python 的 sqlite3 库都支持
enable_load_extension。不过,我不确定哪些环境或 Python 版本会遇到这个问题。我使用conda来管理 Python,通过conda安装的 Python macOS、Windows x86 和 Ubuntu 22.04 上都可以正常工作。 请确认以下命令在你的 Python 环境中是否正常工作: ``python import sqlite3 # Check sqlite version print(f"SQLite version: {sqlite3.sqlite_version}") # Test if enable_load_extension is supported try: conn = sqlite3.connect(':memory:') conn.enable_load_extension(True) print("enable_load_extension is supported") except AttributeError: print("enable_load_extension is not supported") finally: conn.close()`` 如果你发现这样无法正常工作,那么可以安装 miniconda 来管理 Python 环境。或者查看目前的 issue 列表,看看是否有其他人遇到同样的问题。
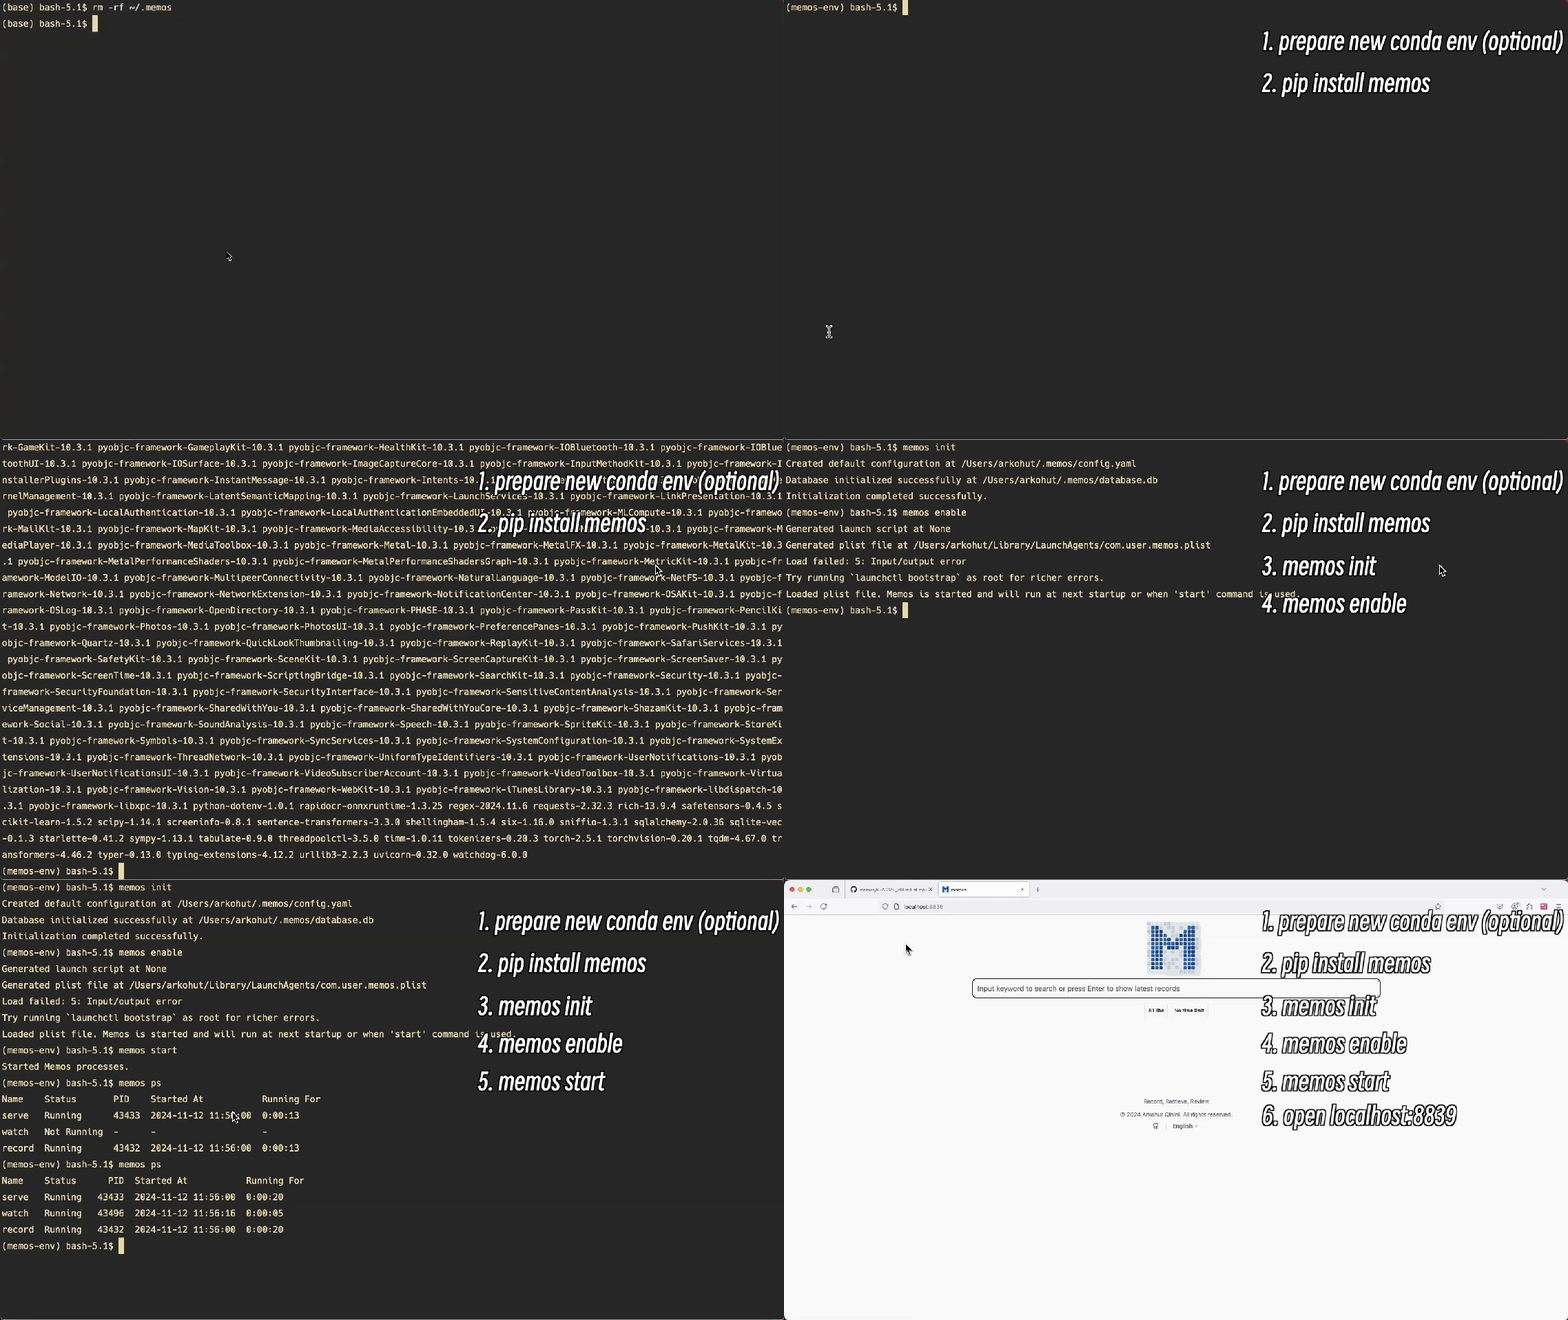
1. 安装 Pensieve
pip install -i https://mirrors.tuna.tsinghua.edu.cn/pypi/web/simple memosWindows 用户建议用
uv tool install memos或pipx install memos,不要直接pip install——完整清单见 Windows 安装指引。
2. 初始化
初始化 pensieve 的配置文件和 sqlite 数据库:
memos init数据将存放在 ~/.memos 目录中。
3. 启动服务
memos enable
memos start
这个命令会:
- 开始对所有屏幕进行记录
- 启动 Web 服务
- 将服务设置为开机启动
4. 访问 Web 界面
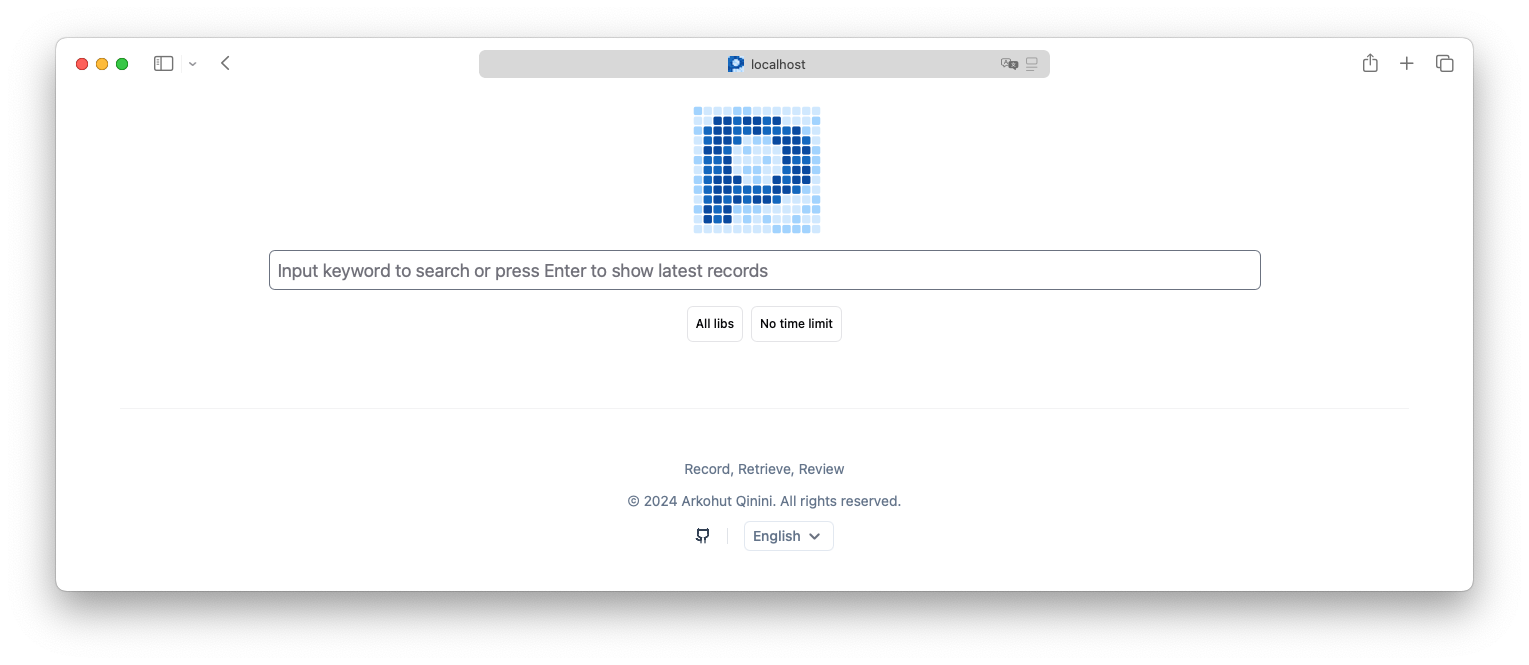
打开浏览器,访问 http://localhost:8839
Mac 下的权限问题
在 Mac 下,Pensieve 需要获取录屏权限。第一次执行 memos start 时,macOS 会弹出录屏授权对话框,允许即可。
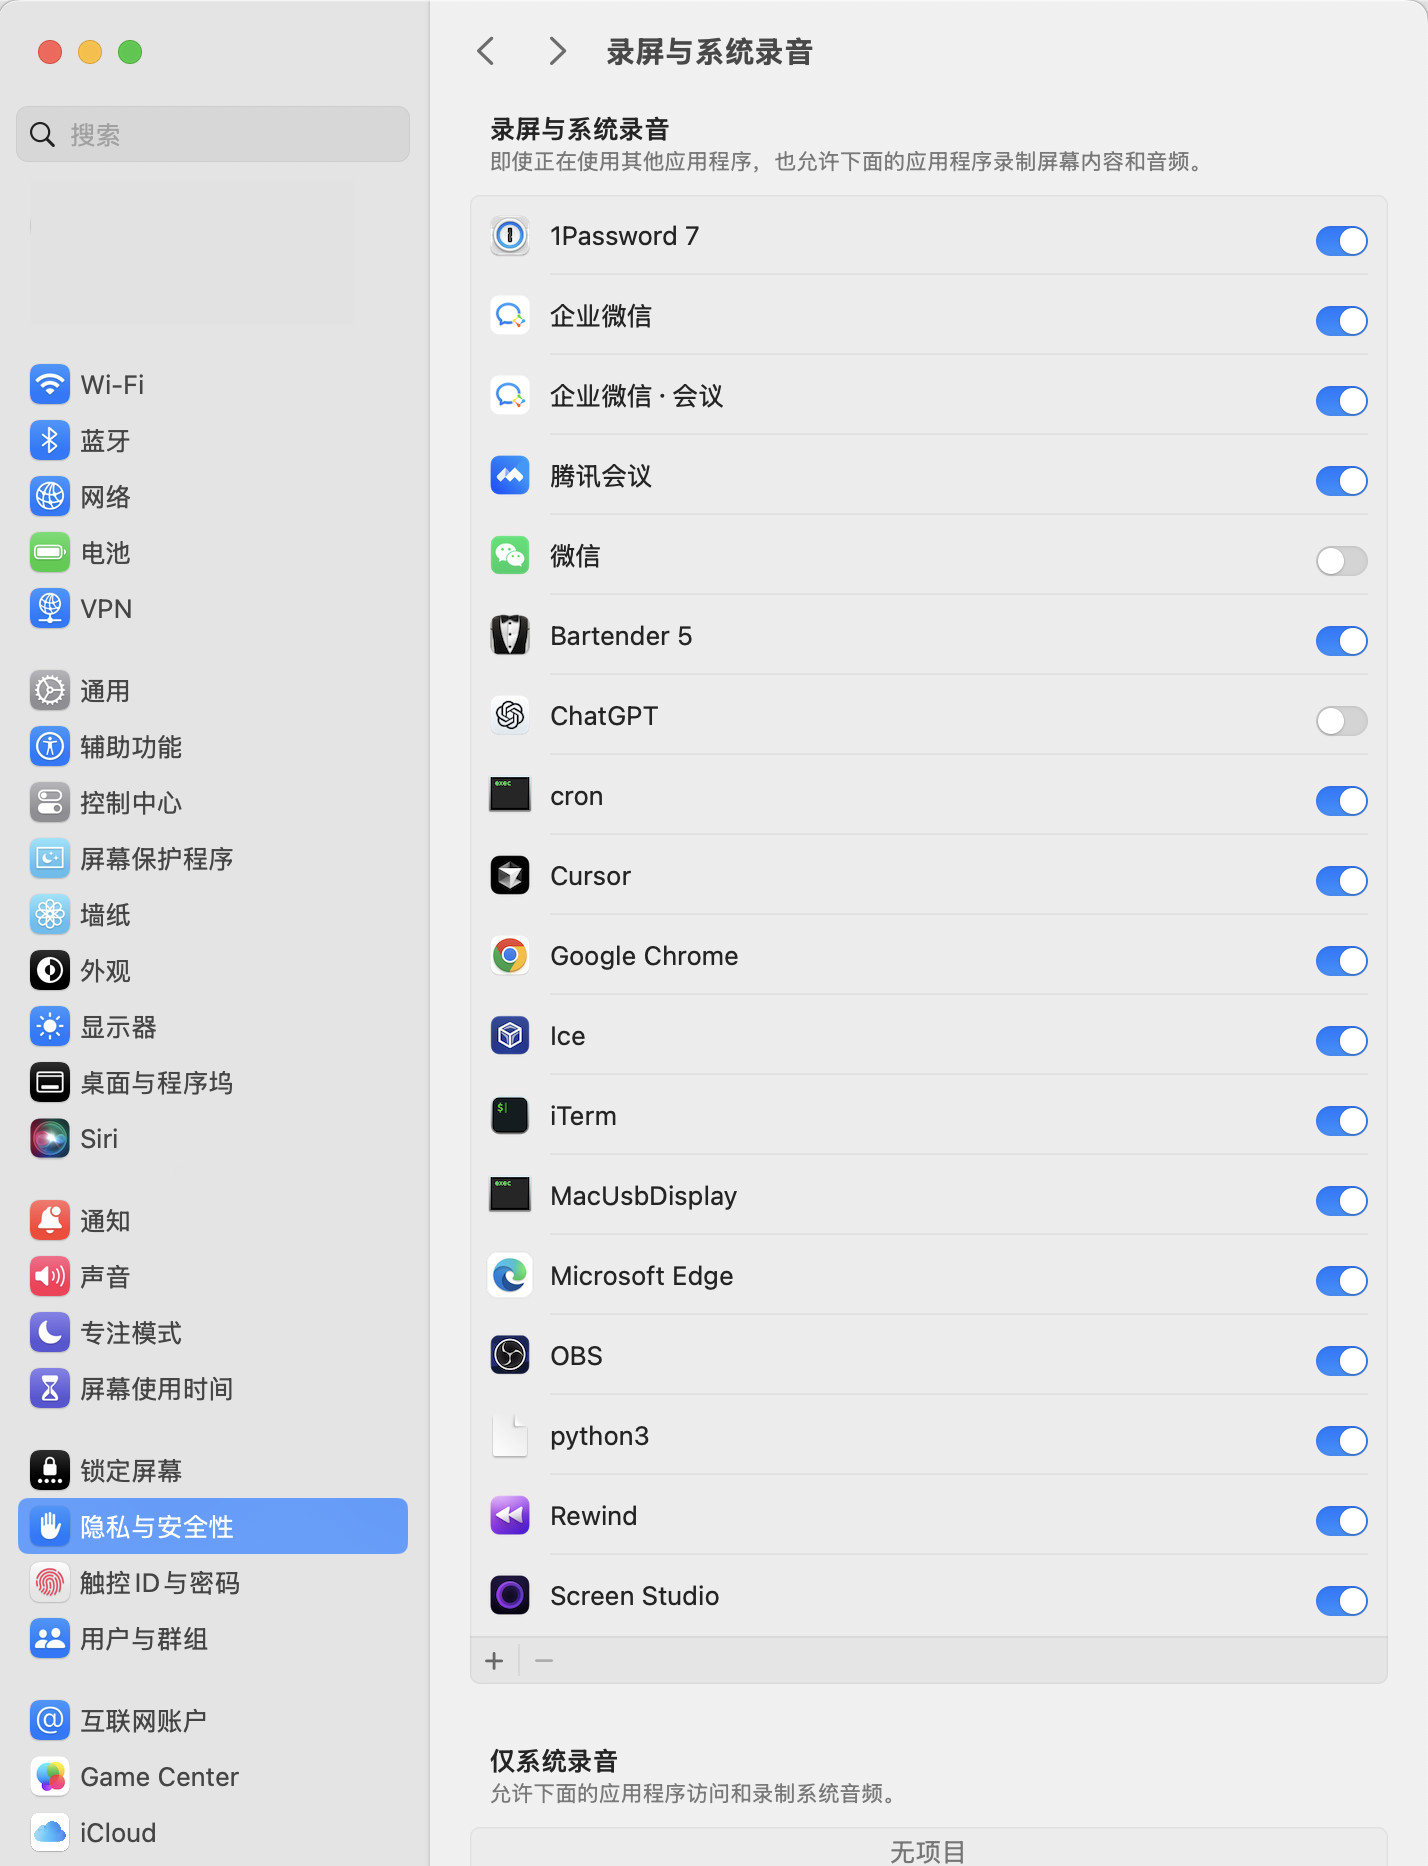
要在不触发弹窗的情况下检查当前授权状态,运行:
memos doctor它会打印出需要被授权的 Python 解释器路径,并告诉你去 系统设置 → 隐私与安全性 → 屏幕与系统音频录制 里找哪一条开启。
如果你升级了 Python(brew upgrade python、切了新的 pyenv 版本、重建了 conda 环境等),原来的授权会失效——因为 macOS 的 TCC 是按二进制路径记账的。复位后重新授权即可:
tccutil reset ScreenCapture
memos stop && memos start
如果想避免这种反复,建议用 pipx install memos 或 uv tool install memos 安装——它们会把解释器路径固定下来,memos 自身升级时不会影响录屏授权。
Windows 安装指引
Windows 上更稳的做法是把 memos 装在隔离的工具 venv 里,不要直接污染全局 site-packages:
# 方案 A:uv(单二进制、速度快)
powershell -ExecutionPolicy ByPass -c "irm https://astral.sh/uv/install.ps1 | iex"
uv tool install memos

# 方案 B:pipx
pip install --user pipx
python -m pipx ensurepath
pipx install memos
两种方式都会把 memos 装在专属 venv 里,解释器路径不会随升级飘动。装完后用 memos doctor 自检一遍环境。
在跑 memos enable && memos start 之前,两件事值得先做一下:
# 在管理员 PowerShell 里执行

# 启用长路径——torch、modelscope 等 ML 包的路径很深,260 字符限制会出问题
Set-ItemProperty -Path "HKLM:\SYSTEM\CurrentControlSet\Control\FileSystem" -Name "LongPathsEnabled" -Value 1

# 把 ~/.memos 加进 Defender 排除列表,避免每张截图都被扫一遍
Add-MpPreference -ExclusionPath "$env:USERPROFILE\.memos"
如果你的 %USERPROFILE% 被 OneDrive 重定向了,~/.memos 可能会把每天 ~400MB 截图同步到云端。装完 memos init 后看一眼 ~/.memos 的真实位置;如果是 OneDrive 下,改 ~/.memos/config.yaml 里的 base_dir 指到本地非同步目录。
Windows 上不推荐这些组合:
- Microsoft Store 版 Python——文件系统是沙盒化的,
~/.memos路径和 subprocess 都不正常 - 在 WSL 里跑 memos——WSL 看不到 Windows 宿主屏幕,截不到东西
%USERPROFILE%被 OneDrive 同步(参见上面)
🚀 使用 PostgreSQL 数据库
要在 Pensieve 中使用 PostgreSQL,您需要安装支持 PostgreSQL 的软件包:
pip install memos[postgresql]从 v0.25.4 版本开始,Pensieve 开始完整支持使用 PostgreSQL 作为后端数据库。相比 SQLite,PostgreSQL 在数据规模较大时依然可以获取非常好的检索性能。
如果你的截图数据规模较大,或者对检索响应速度有较高要求,强烈建议使用 PostgreSQL 作为后端数据库。
1. 使用 Docker 启动 PostgreSQL
由于 Pensieve 使用了向量检索功能,因此需要使用带有 pgvector 扩展的 PostgreSQL。我们推荐使用官方的 pgvector 镜像:
在 Linux/macOS 下:
docker run -d \
    --name pensieve-pgvector \
    --restart always \
    -p 5432:5432 \
    -e POSTGRES_PASSWORD=mysecretpassword \
    -v pensieve-pgdata:/var/lib/postgresql/data \
    pgvector/pgvector:pg17
在 Windows PowerShell 下:
docker run -d `
    --name pensieve-pgvector `
    --restart always `
    -p 5432:5432 `
    -e POSTGRES_PASSWORD=mysecretpassword `
    -v pensieve-pgdata:/var/lib/postgresql/data `
    pgvector/pgvector:pg17
在 Windows 传统命令提示符下:
docker run -d ^
    --name pensieve-pgvector ^
    --restart always ^
    -p 5432:5432 ^
    -e POSTGRES_PASSWORD=mysecretpassword ^
    -v pensieve-pgdata:/var/lib/postgresql/data ^
    pgvector/pgvector:pg17
这个命令会:
- 创建一个名为
pensieve-pgvector的容器 - 设置 PostgreSQL 的密码为
mysecretpassword - 将容器的 5432 端口映射到主机的 5432 端口
- 使用支持向量检索的 PostgreSQL 17 版本
- 创建一个名为
pensieve-pgdata的数据卷来持久化存储数据 - 设置容器在 Docker 重启后自动启动
注意:如果你使用的是 Windows,需要先确保 Docker Desktop 已经安装并运行。你可以从 Docker 官网 下载并安装 Docker Desktop。
2. 配置 Pensieve 使用 PostgreSQL
修改 ~/.memos/config.yaml 文件中的数据库配置:
# 将原来的 SQLite 配置:
database_path: database.db

# 改为 PostgreSQL 配置:
database_path: postgresql://postgres:mysecretpassword@localhost:5432/postgres
配置说明:
postgres:mysecretpassword:数据库用户名和密码localhost:5432:PostgreSQL 服务器地址和端口postgres:数据库名称
3. 从 SQLite 迁移到 PostgreSQL
如果你之前使用的是 SQLite,想要迁移到 PostgreSQL,Pensieve 提供了专门的迁移命令:
# 停止 Pensieve 服务
memos stop

# 执行迁移
memos migrate \
  --sqlite-url "sqlite:///absolute/path/to/your/database.db" \
  --pg-url "postgresql://postgres:mysecretpassword@localhost:5432/postgres"

# 修改配置文件指向 PostgreSQL
# 编辑 ~/.memos/config.yaml,更新 database_path

# 重新启动服务
memos start
注意事项:
- 迁移前请确保 PostgreSQL 服务正常运行
- 迁移过程会完全清空目标 PostgreSQL 数据库,请确保数据库中没有重要数据
- 迁移不会影响原有的 SQLite 数据库
- 迁移过程可能需要一些时间,取决于数据量的大小
- 迁移完成后,你可以选择备份并删除原来的 SQLite 数据库文件
下面分别是 Mac 和 Windows 的迁移命令:
# Mac
memos migrate \
  --sqlite-url "sqlite:///~/.memos/database.db" \
  --pg-url "postgresql://postgres:mysecretpassword@localhost:5432/postgres"
# Windows PowerShell
memos migrate `
--sqlite-url "sqlite:///$env:USERPROFILE/.memos/database.db" `
--pg-url "postgresql://postgres:mysecretpassword@localhost:5432/postgres"# Windows Command Line
memos migrate ^
--sqlite-url "sqlite:///%USERPROFILE%/.memos/database.db" ^
--pg-url "postgresql://postgres:mysecretpassword@localhost:5432/postgres"使用指南
增强的实体详情视图
Pensieve v0.29.0 引入了全面的实体详情视图,为您的截图提供更深入的洞察:
- 交互式上下文导航:点击任何搜索结果即可打开详细的实体视图,支持时间序列上下文导航
- 上下文导航栏:使用底部的水平上下文导航栏浏览截图,按时间顺序显示前后截图
- 丰富的元数据显示:查看全面的元数据,包括浏览器 URL、应用程序名称、时间戳和提取的文本
- 增强的视觉上下文:通过改进的元数据捕获,更好地了解您的数字活动
新的实体视图让您更容易重建数字时间线,并找到特定时刻周围的相关内容。
使用 Agent Skill 搜索
Pensieve v0.33.0 随仓库分发了一份 agent skill —— 一个与具体 agent 无关的可移植说明文件,能教任意支持 Skill 的 AI 工具(Claude Code、Codex、opencode 等)通过 HTTP API 查询你的截图归档。
它能做什么:
- 自然语言查询:可以直接问 "找一下我上周看过的那个东西" 或者 "我什么时候在做 Mastra 集成" —— agent 会把这些请求翻译成带正确文本、时间窗口和
active_app过滤条件的/api/search调用。 - 可验证的结果:返回的是按相关度排序的 entity id,以及
/entities/<id>的链接,所有引用都可以一键回到真实截图。 - 先探索后收窄:skill 引导 agent 先跑一次宽查询,观察
active_app/url的分布再决定锚点 —— 因为你提问中的话题在截图语料里通常不会以字面字符串出现。
使用方法:把 agent 指向 skill 文件即可。把本仓库作为工作目录打开时,skill 会从 skills/pensieve-search/SKILL.md 自动发现。要在其他项目中使用,把这份文件复制或软链到 agent 自己的 skill 目录 —— 例如 ~/.claude/skills/pensieve-search/(Claude Code),或 ~/.agents/skills/pensieve-search/(Codex / opencode 等遵循共享 .agents/ 约定的工具)。使用前请确认本机 memos 已启动 —— skill 默认访问 http://127.0.0.1:8839。
使用配置管理界面
Pensieve v0.27.0 版本引入了全新的配置管理界面,让您可以更方便地管理系统设置:
- 在浏览器中访问
http://localhost:8839/config - 界面分为几个主要部分:通用配置、服务器配置、记录配置、监控配置等
- 修改相关设置后点击"保存更改"按钮
- 对于需要重启服务的更改,系统会自动提示并提供服务重启选项
通过配置界面,您可以轻松调整各种设置,如 OCR 和 VLM 选项、空闲处理策略、数据库配置等,无需手动编辑配置文件。
使用合适的 embedding 模型
1. 模型选择
Pensieve 通过 embedding 模型来提取语义信息,并构建向量索引。因此,选择一个合适的 embedding 模型非常重要。针对使用者的主语言,需要选择不同的 embedding 模型。
- 对于中文场景,可以使用 jinaai/jina-embeddings-v2-base-zh 模型。
- 对于英文场景,可以使用 jinaai/jina-embeddings-v2-base-en 模型。
2. 调整 Pensieve 配置
使用你喜欢的文本编辑器打开 ~/.memos/config.yaml 文件,并修改 embedding 配置:
embedding:
  use_local: true
  model: arkohut/jina-embeddings-v2-base-zh  # 使用的模型名称
  num_dim: 768                               # 模型的维度
use_modelscope: false # 是否使用魔搭(ModelScope)的模型- 配置这里我使用的模型名称为
arkohut/jina-embeddings-v2-base-zh,这是我对原始的模型仓库做了裁剪,删除了一些用不到的模型文件,加速下载的速度。 - 如果你无法访问 Hugging Face 的模型仓库,可以设置
use_modelscope为true,通过魔搭(ModelScope)模型仓库下载模型。
3. 重启 Pensieve 服务
memos stop
memos start
第一次使用 embedding 模型时,Pensieve 会自动下载模型并加载模型。
4. 重新构建索引
如果你是在使用过程中切换了 embedding 模型,也就是说你之前已经索引过截图,那么你需要重新构建索引:
memos reindex --force--force 参数表示重新构建索引表,并删除之前索引的截图数据。
使用 Ollama 支持视觉检索
默认情况下,Pensieve 仅启用 OCR 插件来提取截图中的文字并建立索引。然而,对于不包含文字的图像,这种方式会大大限制检索效果。
为了实现更全面的视觉检索功能,我们需要一个兼容 OpenAI API 的多模态图像理解服务。Ollama 正好可以完美胜任这项工作。
使用前的重要说明
在决定是否启用 VLM 功能前,请注意以下几点:
- 硬件要求
- 推荐配置:至少 8GB 显存的 NVIDIA 显卡或 M 系列芯片的 Mac - minicpm-v 模型将占用约 5.5GB 存储空间 - 不建议使用 CPU 模式,会导致系统严重卡顿
- 性能和功耗影响
- 启用 VLM 后会显著增加系统功耗 - 可以考虑使用其他设备提供 OpenAI API 兼容的模型服务
1. 安装 Ollama
请访问 Ollama 官方文档 获取详细的安装和配置指南。
2. 准备多模态模型
使用以下命令下载并运行多模态模型 minicpm-v:
ollama run minicpm-v "描述一下这是什么服务"这条命令会下载并运行 minicpm-v 模型,如果发现运行速度太慢的话,不推荐使用这部分功能。
3. 配置 Pensieve 使用 Ollama
使用你喜欢的文本编辑器打开 ~/.memos/config.yaml 文件,并修改 vlm 配置:
vlm:
  endpoint: http://localhost:11434  # Ollama 服务地址
  modelname: minicpm-v              # 使用的模型名称
  force_jpeg: true                  # 将图片转换为 JPEG 格式以确保兼容性
  prompt: 请帮描述这个图片中的内容,包括画面格局、出现的视觉元素等  # 发送给模型的提示词
使用上述配置覆盖 ~/.memos/config.yaml 文件中的 vlm 配置。
同时还要修改 ~/.memos/plugins/vlm/config.yaml 文件中的 default_plugins 配置:
default_plugins:
- builtin_ocr
- builtin_vlm
这里就是将 builtin_vlm 插件添加到默认的插件列表中。
4. 重启 Pensieve 服务
memos stop
memos start
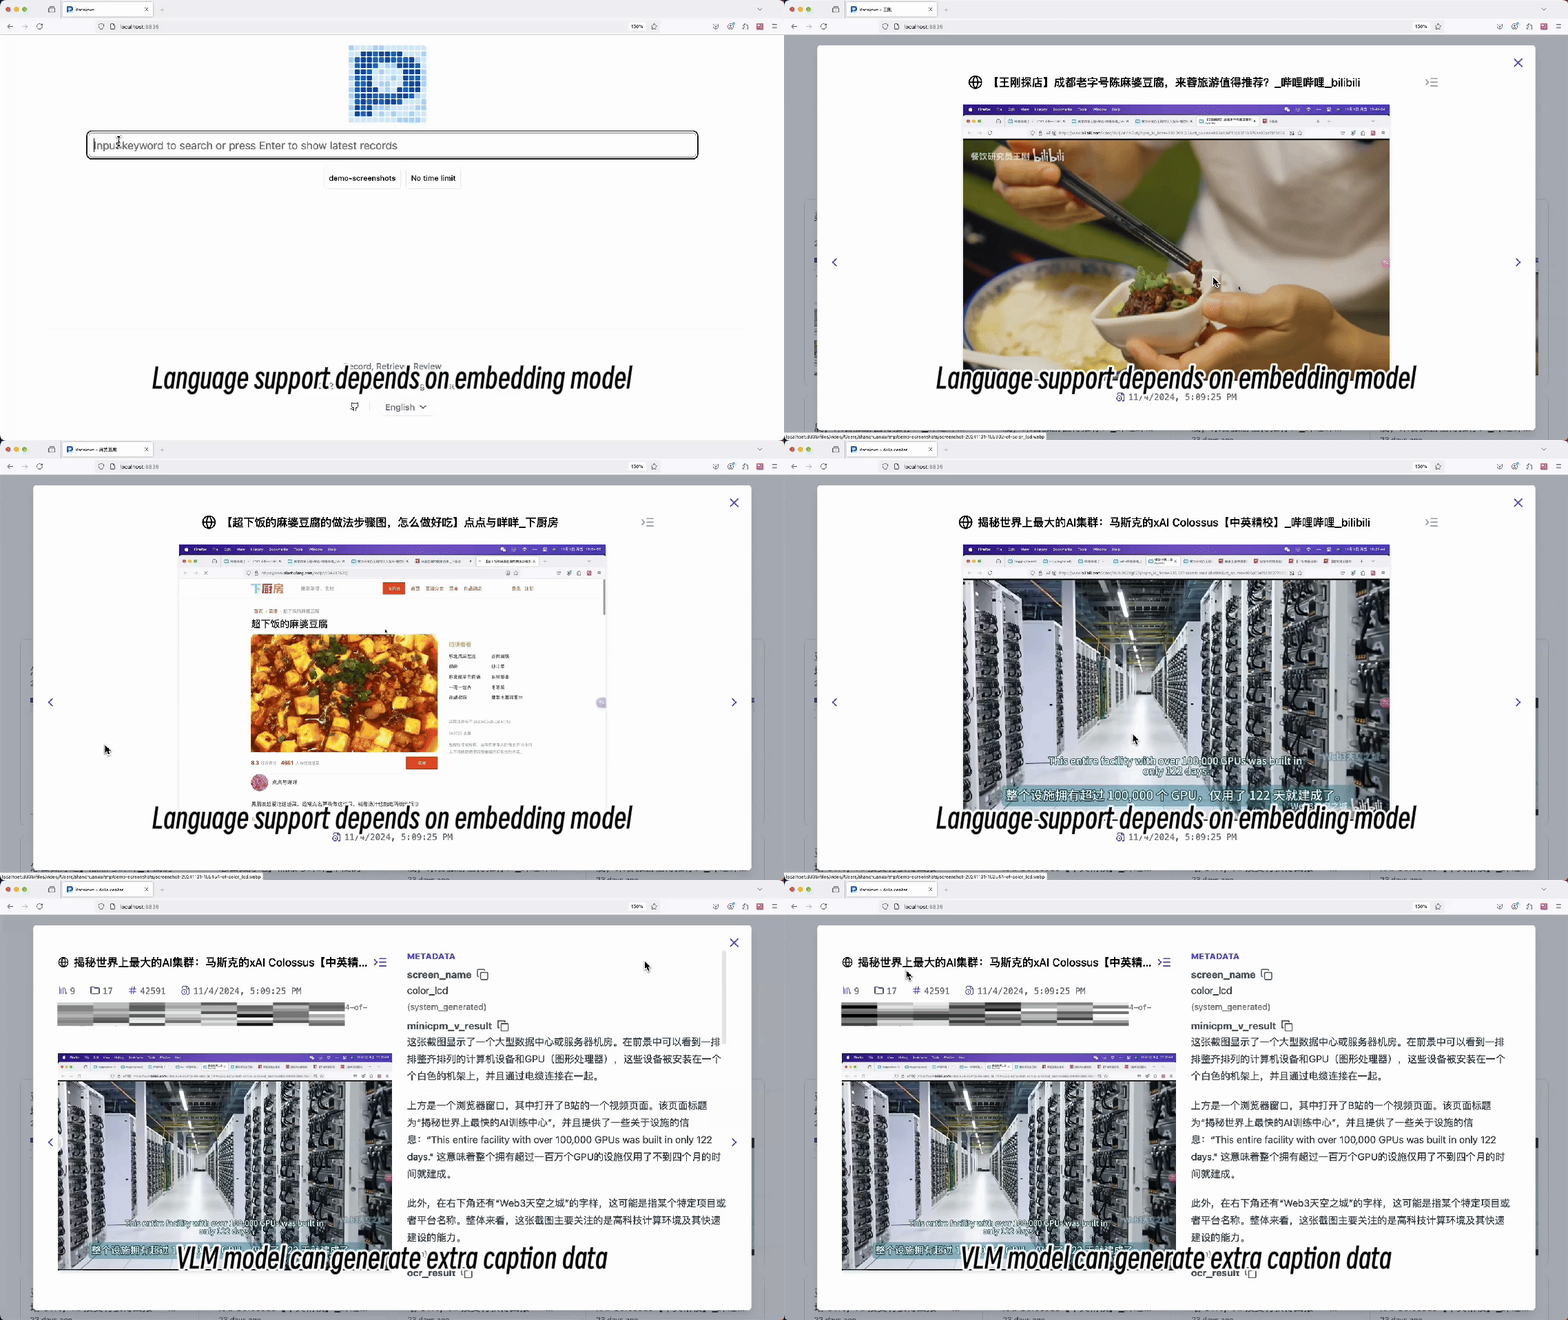
重启 Pensieve 服务之后,稍等片刻,就可以在 Pensieve 的 Web 界面中最新的截图里看到通过 VLM 所提取的数据了:
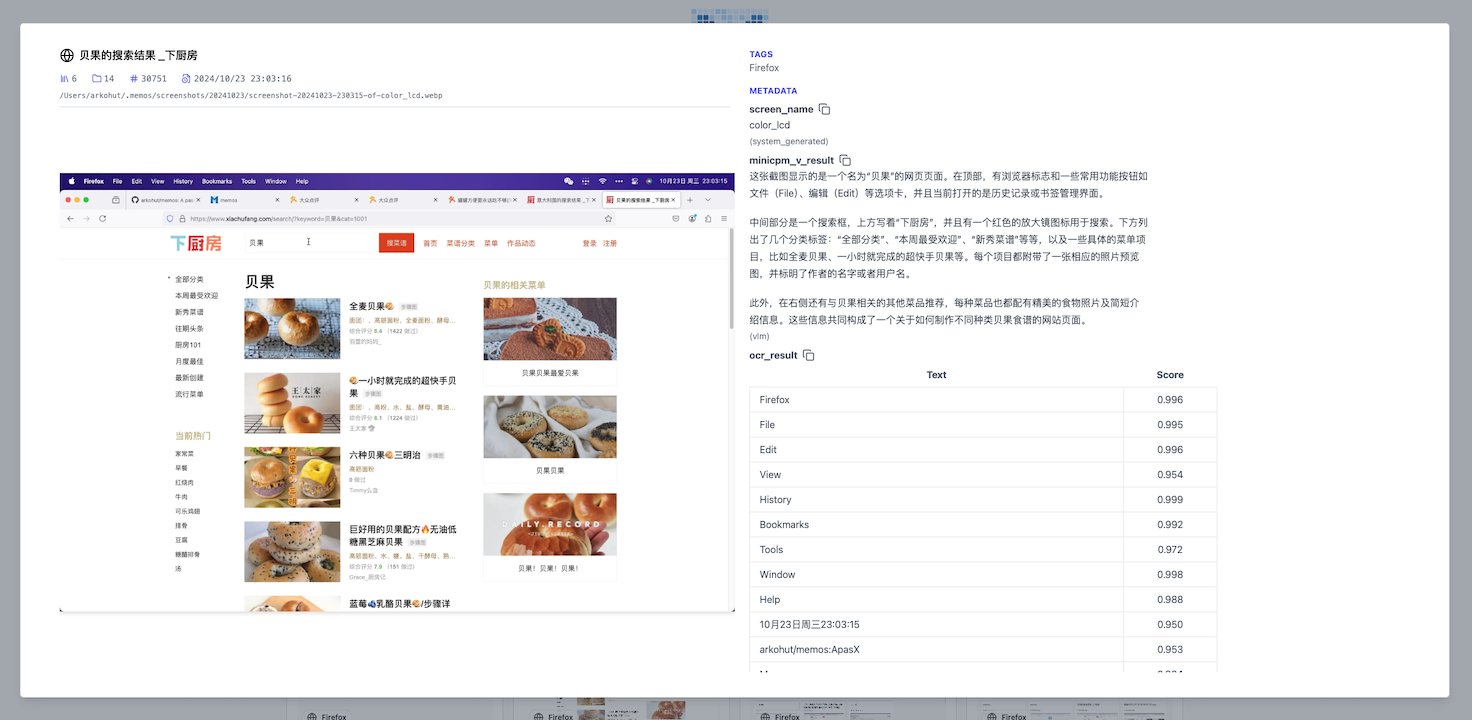
如果没有看到 VLM 的结果,可以:
- 使用命令
memos ps查看 Pensieve 进程是否正常运行 - 检查
~/.memos/logs/memos.log中是否有错误信息 - 确认 Ollama 模型是否正确加载(
ollama ps)
全量索引
Pensieve 是一个计算密集型的应用,Pensieve 的索引过程会需要 OCR、VLM 以及 embedding 模型协同工作。为了尽量减少对用户电脑的影响,Pensieve 会计算每个截图的平均处理时间,并依据这个时间来调整索引的频率。因此,默认情况下并不是所有的截图都会被立即索引。
如果希望对所有截图进行索引,可以使用以下命令进行全量索引:
memos scan该命令会扫描并索引所有已记录的截图。请注意,根据截图数量和系统配置的不同,这个过程可能会持续一段时间,并且会占用较多系统资源。索引的构建是幂等的,多次运行该命令不会对已索引的数据进行重复索引。
调整索引频率
Pensieve 在运行时,会根据截图生成的频率和单个截图的处理速度动态调整图像处理的间隔。对于没有 NVIDIA GPU 的情况,很难保证单个图像的处理速度比截图生成速度快,因此截图处理是抽样执行的。为了避免电脑负载过高,Pensieve 默认的抽样策略非常保守,这可能会导致有充足算力的设备无法充分发挥其性能。因此,在 config.yaml 中增加了更多的控制选项,允许用户选择更保守或更激进的策略。
watch:
  # 统计处理速率的窗口大小
  rate_window_size: 10
  # 文件处理的稀疏因子
  # 值越高,处理频率越低
  # 1.0 表示处理每个文件,不能小于 1.0
  sparsity_factor: 3.0
  # 文件处理的初始间隔,表示每 N 个文件处理一个文件
  # 但会根据处理速率自动调整
  # 12 表示一开始每 12 个文件处理一个文件
  processing_interval: 12
如果希望每个截图文件都被处理,可以这么配置:
# 这样的监控配置意味着一开始会处理每个文件
# 但如果处理速度比文件生成速度慢,处理间隔将会自动增加
watch:
  rate_window_size: 10
  sparsity_factor: 1.0
  processing_interval: 1
空闲处理策略
Pensieve 实现了智能的空闲处理策略,以在系统空闲时处理未处理的文件。这有助于确保所有截图最终都能被处理,同时最小化对系统活跃使用时的性能影响。
空闲检测和处理
- 系统在 5 分钟没有新的截图活动后进入空闲状态
- 在空闲状态下,Pensieve 会尝试处理之前未处理的文件,前提是:
- 系统不在使用电池供电 - 当前时间在配置的处理时间窗口内 - 有待处理的文件
配置说明
空闲处理行为可以在 ~/.memos/config.yaml 中自定义:
watch:
  # 进入空闲状态前等待的秒数
  idle_timeout: 300
  # 处理未处理文件的时间窗口
  # 格式:["HH:MM", "HH:MM"]
idle_process_interval: ["00:00", "07:00"]idle_timeout:系统在多少秒没有活动后进入空闲状态idle_process_interval:可以处理未处理文件的时间窗口
- 格式为 ["HH:MM", "HH:MM"],使用 24 小时制 - 时间窗口可以跨越午夜(例如 ["23:00", "07:00"] 是有效的) - 对于跨越午夜的时间窗口,开始时间必须在 12:00 之后以避免歧义
这个策略确保:
- 系统资源在工作时间主要用于活跃使用
- 后台处理在非工作时间进行
- 通过避免在电池供电时处理来延长电池寿命
记得执行 memos stop && memos start 使任何配置更改生效。
隐私安全
在开发 Pensieve 的过程中,我一直密切关注类似产品的进展,特别是 Rewind 和 Windows Recall。我非常欣赏它们的产品理念,但它们在隐私保护方面做得不够,这也是许多用户(或潜在用户)所担心的问题。记录个人电脑的屏幕可能会暴露极为敏感的隐私数据,如银行账户、密码、聊天记录等。因此,确保数据的存储和处理完全由用户掌控,防止数据泄露,变得尤为重要。
Pensieve 的优势在于:
- 代码完全开源,并且是易于理解的 Python 代码,任何人都可以审查代码,确保没有后门。
- 数据完全本地化,所有数据都存储在本地,数据处理完全由用户控制,数据将被存储在用户的
~/.memos目录中。 - 易于卸载,如果不再使用 Pensieve,通过
memos stop && memos disable即可关闭程序,然后通过pip uninstall memos即可卸载,最后删除~/.memos目录即可清理所有的数据库和截图数据。 - 数据处理完全由用户控制,Pensieve 是一个独立项目,所使用的机器学习模型(包括 VLM 以及 embedding 模型)都由用户自己选择,并且由于 Pensieve 的运作模式,使用较小的模型也可以达到不错的效果。
当然 Pensieve 肯定在隐私方面依然有可以改进的地方,欢迎大家贡献代码,一起让 Pensieve 变得更好。
其他值得注意的内容
有关存储空间
Pensieve 每 5 秒会记录一次屏幕,并将原始截图保存到 ~/.memos/screenshots 目录中。存储空间占用主要取决于以下因素:
- 截图数据:
- 单张截图大小:约 40-400KB(取决于屏幕分辨率以及显示的复杂程度) - 日均数据量:约 400MB(基于 10 小时使用时长,单屏幕 2560x1440 分辨率) - 多屏幕使用:数据量会随屏幕数量增加 - 月度估算:按 20 个工作日计算,约 8GB
截图会进行去重,如果连续截图内容变化不大,那么只会保留一张截图,去重机制可以在内容变化不频繁时(如阅读、文档编辑等场景)显著减少存储占用。
- 数据库空间:
- SQLite 数据库大小取决于索引的截图数量 - 参考值:10 万张截图索引后约占用 2.2GB 存储空间
有关功耗
Pensieve 默认需要两个计算密集型的任务:
- 一个是 OCR 任务,用于提取截图中的文字
- 一个是 embedding 任务,用于提取语义信息构建向量索引
资源使用情况
- OCR 任务:使用 CPU 执行,并根据不同操作系统优化选择 OCR 引擎,以最小化 CPU 占用
- Embedding 任务:智能选择计算设备
- NVIDIA GPU 设备优先使用 GPU - Mac 设备优先使用 Metal GPU - 其他设备使用 CPU
性能优化策略
为了避免影响用户日常使用,Pensieve 采取了以下优化措施:
- 动态调整索引频率,根据系统处理速度自适应
- 电池供电时自动降低处理频率,最大程度节省电量
开发指南
拨开第一层洋葱
事实上,Pensieve 启动之后,会运行三个程序:
memos serve启动 Web 服务memos record启动截图记录程序memos watch监听memos record所生成的图像事件,并结合实际的处理速度动态的向服务器提交索引请求
所以,如果你是开发者,或者希望更清晰的看到整个项目运行的日志,你完全可以使用这三个命令让每个部分在前台运行,去替代 memos enable && memos start 命令。
<div align="center"> <img src="web/public/logos/pensieve_logo_512.png" width="250"/> </div>
I changed the name to Pensieve because Memos was already taken.
Pensieve (previously named Memos)
Pensieve is a privacy-focused passive recording project. It can automatically record screen content, build intelligent indices, and provide a convenient web interface to retrieve historical records.
This project draws heavily from two other projects: one called Rewind and another called Windows Recall. However, unlike both of them, Pensieve allows you to have complete control over your data, avoiding the transfer of data to untrusted data centers.
Features
- 🚀 Simple installation: just install dependencies via pip to get started
- 🔒 Complete data control: all data is stored locally, allowing for full local operation and self-managed data processing
- 🔍 Full-text and vector search support
- 📊 Interactive entity detail view with chronological context navigation
- 🌐 Smart metadata capture including browser URL retrieval for web activities
- 🤖 Integrates with Ollama, using it as the machine learning engine for Pensieve
- 🌐 Compatible with any OpenAI API models (e.g., OpenAI, Azure OpenAI, vLLM, etc.)
- 💻 Supports Mac and Windows (Linux support is in development)
- 🔌 Extensible functionality through plugins
📰 Latest News
- Pensieve Agent Skill: Version
v0.33.0ships an agent skill so any Skill-aware AI tool — Claude Code, Codex, opencode, etc. — can search your screenshot archive in natural language and link straight to the entity detail page. See Searching with an Agent Skill. - Application Blacklist Feature: Version
v0.30.0introduces an application blacklist feature that allows you to exclude specific applications from screenshot recording. This feature includes blacklist checking in both recording and file watching processes, with an enhanced UI for blacklist management in the configuration panel. - Enhanced Entity Detail View: Version
v0.29.0introduces a new entity detail page with interactive context navigation, allowing you to browse through screenshots chronologically with improved visual context and metadata display. - Configuration Management UI: Version
v0.27.0introduces an intuitive configuration management interface that allows you to easily configure all Pensieve settings through the web interface.
Quick Start
[!IMPORTANT] It seems that not all versions of Python's sqlite3 library support
enable_load_extension. However, I'm not sure which environments or Python versions might encounter this issue. I usecondato manage Python, and Python installed viacondaworks fine on macOS, Windows x86, and Ubuntu 22.04. Please ensure the following command works in your Python environment: ``python import sqlite3 # Check sqlite version print(f"SQLite version: {sqlite3.sqlite_version}") # Test if enable_load_extension is supported try: conn = sqlite3.connect(':memory:') conn.enable_load_extension(True) print("enable_load_extension is supported") except AttributeError: print("enable_load_extension is not supported") finally: conn.close()`` If you find that this does not work properly, you can install miniconda to manage your Python environment. Alternatively, check the current issue list to see if others have encountered the same problem.
1. Install Pensieve
pip install memosOn Windows, prefer
uv tool install memosorpipx install memosover barepip install— see Windows Installation Notes for the full setup checklist.
2. Initialize
Initialize the pensieve configuration file and sqlite database:
memos initData will be stored in the ~/.memos directory.
3. Start the Service
memos enable
memos start
This command will:
- Begin recording all screens
- Start the Web service
- Set the service to start on boot
4. Access the Web Interface
Open your browser and visit http://localhost:8839
Mac Permission Issues
On Mac, Pensieve needs screen recording permission. The first time memos start runs, macOS will prompt you to allow screen recording — please allow it.
To check what is currently authorized (without triggering a prompt), run:
memos doctorIt will print the Python interpreter path that needs the permission, and tell you exactly where to find it in System Settings → Privacy & Security → Screen & System Audio Recording.
If you upgrade Python (e.g. brew upgrade python, a new pyenv version, recreating a conda env), the previously granted permission becomes stale because TCC is keyed on the binary path. Reset and re-authorize:
tccutil reset ScreenCapture
memos stop && memos start
To avoid this churn, install via pipx install memos or uv tool install memos — both pin the interpreter path so authorization survives memos upgrades.
Windows Installation Notes
For a smoother Windows setup, install memos as an isolated tool rather than into the global site-packages:
# Option A: uv (fast, single binary)
powershell -ExecutionPolicy ByPass -c "irm https://astral.sh/uv/install.ps1 | iex"
uv tool install memos

# Option B: pipx
pip install --user pipx
python -m pipx ensurepath
pipx install memos
Both keep memos in a dedicated venv so the Python interpreter path stays stable across upgrades. After install, run memos doctor to verify the environment.
Before memos enable && memos start, two preparations make a real difference:
# Run in an Admin PowerShell

# Enable long paths — some ML wheels (torch, modelscope) have deep paths
Set-ItemProperty -Path "HKLM:\SYSTEM\CurrentControlSet\Control\FileSystem" -Name "LongPathsEnabled" -Value 1

# Exclude ~/.memos from Defender so screenshot writes aren't scanned
Add-MpPreference -ExclusionPath "$env:USERPROFILE\.memos"
If your %USERPROFILE% is redirected to OneDrive, ~/.memos may sync ~400MB of screenshots per day to the cloud. Change base_dir in ~/.memos/config.yaml to a local, non-synced path.
Avoid these setups on Windows:
- Python from the Microsoft Store — sandboxed filesystem breaks
~/.memospaths and subprocess behavior - Running memos inside WSL — WSL can't capture the Windows host's screen
- A
%USERPROFILE%synced by OneDrive (see above)
🚀 Using PostgreSQL Database
To use PostgreSQL with Pensieve, you need to install the package with PostgreSQL support:
pip install memos[postgresql]Starting from version v0.25.4, Pensieve fully supports using PostgreSQL as the backend database. Compared to SQLite, PostgreSQL can maintain excellent retrieval performance even with large data volumes.
If your screenshot data is large or you require high retrieval response speed, it is strongly recommended to use PostgreSQL as the backend database.
1. Start PostgreSQL with Docker
Since Pensieve uses vector search functionality, it requires PostgreSQL with the pgvector extension. We recommend using the official pgvector image:
On Linux/macOS:
docker run -d \
    --name pensieve-pgvector \
    --restart always \
    -p 5432:5432 \
    -e POSTGRES_PASSWORD=mysecretpassword \
    -v pensieve-pgdata:/var/lib/postgresql/data \
    pgvector/pgvector:pg17
On Windows PowerShell:
docker run -d `
    --name pensieve-pgvector `
    --restart always `
    -p 5432:5432 `
    -e POSTGRES_PASSWORD=mysecretpassword `
    -v pensieve-pgdata:/var/lib/postgresql/data `
    pgvector/pgvector:pg17
On Windows Command Prompt:
docker run -d ^
    --name pensieve-pgvector ^
    --restart always ^
    -p 5432:5432 ^
    -e POSTGRES_PASSWORD=mysecretpassword ^
    -v pensieve-pgdata:/var/lib/postgresql/data ^
    pgvector/pgvector:pg17
This command will:
- Create a container named
pensieve-pgvector - Set the PostgreSQL password to
mysecretpassword - Map the container's port 5432 to the host's port 5432
- Use PostgreSQL version 17 with vector search support
- Create a data volume named
pensieve-pgdatafor persistent data storage - Set the container to start automatically after Docker restarts
Note: If you are using Windows, make sure Docker Desktop is installed and running. You can download and install Docker Desktop from the Docker website.
2. Configure Pensieve to Use PostgreSQL
Modify the database configuration in the ~/.memos/config.yaml file:
# Change the original SQLite configuration:
database_path: database.db

# To PostgreSQL configuration:
database_path: postgresql://postgres:mysecretpassword@localhost:5432/postgres
Configuration explanation:
postgres:mysecretpassword: Database username and passwordlocalhost:5432: PostgreSQL server address and portpostgres: Database name
3. Migrate from SQLite to PostgreSQL
If you previously used SQLite and want to migrate to PostgreSQL, Pensieve provides a dedicated migration command:
# Stop the Pensieve service
memos stop

# Execute the migration
memos migrate \
  --sqlite-url "sqlite:///absolute/path/to/your/database.db" \
  --pg-url "postgresql://postgres:mysecretpassword@localhost:5432/postgres"

# Modify the configuration file to point to PostgreSQL
# Edit ~/.memos/config.yaml to update database_path

# Restart the service
memos start
Notes:
- Ensure the PostgreSQL service is running before migration
- The migration process will completely clear the target PostgreSQL database, ensure there is no important data
- The migration will not affect the original SQLite database
- The migration process may take some time depending on the data size
- After migration, you can choose to backup and delete the original SQLite database file
Below are the migration commands for Mac and Windows:
# Mac
memos migrate \
  --sqlite-url "sqlite:///~/.memos/database.db" \
  --pg-url "postgresql://postgres:mysecretpassword@localhost:5432/postgres"
# Windows PowerShell
memos migrate `
--sqlite-url "sqlite:///$env:USERPROFILE/.memos/database.db" `
--pg-url "postgresql://postgres:mysecretpassword@localhost:5432/postgres"# Windows Command Line
memos migrate ^
--sqlite-url "sqlite:///%USERPROFILE%/.memos/database.db" ^
--pg-url "postgresql://postgres:mysecretpassword@localhost:5432/postgres"User Guide
Enhanced Entity Detail View
Pensieve v0.29.0 introduces a comprehensive entity detail view that provides deeper insights into your screenshots:
- Interactive Context Navigation: Click on any search result to open the detailed entity view with chronological context navigation
- Context Bar: Navigate through screenshots using the horizontal context bar at the bottom, showing previous and next screenshots in chronological order
- Rich Metadata Display: View comprehensive metadata including browser URLs, application names, timestamps, and extracted text
- Enhanced Visual Context: Get better understanding of your digital activities with improved metadata capture
The new entity view makes it easier to reconstruct your digital timeline and find related content around specific moments.
Searching with an Agent Skill
Pensieve v0.33.0 ships an agent skill — a portable, agent-agnostic instruction file that teaches any Skill-aware AI tool (Claude Code, Codex, opencode, …) how to query your screenshot archive over the HTTP API.
What you get:
- Natural-language queries: ask things like "find that thing I looked at last week" or "show me when I was working on the Mastra integration" — the agent translates them into
/api/searchcalls with the right text, time window, andactive_appfilters. - Verifiable answers: results come back as ranked entity ids with links to
/entities/<id>, so every citation is one click away from the actual screenshot. - Explore-first recipe: the skill instructs the agent to run one wide query and inspect the
active_app/urldistribution before narrowing — because the topic you ask about rarely appears as its literal string in the captured corpus.
To use it, point your agent at the skill file. If you open this repo as the working directory, the skill is auto-discovered from skills/pensieve-search/SKILL.md. To use it from any other project, copy or symlink that file into whichever skills directory your agent loads from — for example ~/.claude/skills/pensieve-search/ (Claude Code) or ~/.agents/skills/pensieve-search/ (Codex / opencode and others that follow the shared .agents/ convention). Make sure memos is running locally first — the skill talks to http://127.0.0.1:8839 by default.
Using the Configuration Management UI
Pensieve v0.27.0 introduced a new configuration management interface that makes it easier to manage your system settings:
- Access the configuration UI by visiting
http://localhost:8839/configin your browser - The interface is divided into several main sections: General Configuration, Server Configuration, Record Configuration, Watch Configuration, etc.
- After modifying relevant settings, click the "Save Changes" button
- For changes that require service restart, the system will automatically prompt you and provide service restart options
Through this configuration interface, you can easily adjust various settings such as OCR and VLM options, idle processing strategy, database configuration, and more without manually editing configuration files.
Using the Right Embedding Model
1. Model Selection
Pensieve uses embedding models to extract semantic information and build vector indices. Therefore, choosing an appropriate embedding model is crucial. Depending on the user's primary language, different embedding models should be selected.
- For Chinese scenarios, you can use the jinaai/jina-embeddings-v2-base-zh model.
- For English scenarios, you can use the jinaai/jina-embeddings-v2-base-en model.
2. Adjust Memos Configuration
Open the ~/.memos/config.yaml file with your preferred text editor and modify the embedding configuration:
embedding:
  use_local: true
  model: jinaai/jina-embeddings-v2-base-en   # Model name used
  num_dim: 768                               # Model dimensions
  use_modelscope: false                      # Whether to use ModelScope's model
3. Restart Memos Service
memos stop
memos start
The first time you use the embedding model, Pensieve will automatically download and load the model.
4. Rebuild Index
If you switch the embedding model during use, meaning you have already indexed screenshots before, you need to rebuild the index:
memos reindex --forceThe --force parameter indicates rebuilding the index table and deleting previously indexed screenshot data.
Using Ollama for Visual Search
By default, Pensieve only enables the OCR plugin to extract text from screenshots and build indices. However, this method significantly limits search effectiveness for images without text.
To achieve more comprehensive visual search capabilities, we need a multimodal image understanding service compatible with the OpenAI API. Ollama perfectly fits this role.
Important Notes Before Use
Before deciding to enable the VLM feature, please note the following:
- Hardware Requirements
- Recommended configuration: NVIDIA graphics card with at least 8GB VRAM or Mac with M series chip - The minicpm-v model will occupy about 5.5GB of storage space - CPU mode is not recommended as it will cause severe system lag
- Performance and Power Consumption Impact
- Enabling VLM will significantly increase system power consumption - Consider using other devices to provide OpenAI API compatible model services
1. Install Ollama
Visit the Ollama official documentation for detailed installation and configuration instructions.
2. Prepare the Multimodal Model
Download and run the multimodal model minicpm-v using the following command:
ollama run minicpm-v "Describe what this service is"This command will download and run the minicpm-v model. If the running speed is too slow, it is not recommended to use this feature.
3. Configure Pensieve to Use Ollama
Open the ~/.memos/config.yaml file with your preferred text editor and modify the vlm configuration:
vlm:
  endpoint: http://localhost:11434  # Ollama service address
  modelname: minicpm-v              # Model name to use
  force_jpeg: true                  # Convert images to JPEG format to ensure compatibility
  prompt: Please describe the content of this image, including the layout and visual elements  # Prompt sent to the model
Use the above configuration to overwrite the vlm configuration in the ~/.memos/config.yaml file.
Also, modify the default_plugins configuration in the ~/.memos/plugins/vlm/config.yaml file:
default_plugins:
- builtin_ocr
- builtin_vlm
This adds the builtin_vlm plugin to the default plugin list.
4. Restart Pensieve Service
memos stop
memos start
After restarting the Pensieve service, wait a moment to see the data extracted by VLM in the latest screenshots on the Pensieve web interface:
If you do not see the VLM results, you can:
- Use the command
memos psto check if the Pensieve process is running normally - Check for error messages in
~/.memos/logs/memos.log - Confirm whether the Ollama model is loaded correctly (
ollama ps)
Full Indexing
Pensieve is a compute-intensive application. The indexing process requires the collaboration of OCR, VLM, and embedding models. To minimize the impact on the user's computer, Pensieve calculates the average processing time for each screenshot and adjusts the indexing frequency accordingly. Therefore, not all screenshots are indexed immediately by default.
If you want to index all screenshots, you can use the following command for full indexing:
memos scanThis command will scan and index all recorded screenshots. Note that depending on the number of screenshots and system configuration, this process may take some time and consume significant system resources. The index construction is idempotent, and running this command multiple times will not re-index already indexed data.
Sampling Strategy
Pensieve dynamically adjusts the image processing interval based on the speed of screenshot generation and the speed of processing individual images. In environments without NVIDIA GPUs, it may be challenging to ensure that image processing keeps up with the rate of screenshot generation. To address this, Pensieve processes images on a sampled basis.
To prevent excessive system load, Pensieve's default sampling strategy is intentionally conservative. However, this conservative approach might limit the performance of devices with higher computational capacity. To provide more flexibility, additional control options have been introduced in ~/.memos/config.yaml, allowing users to configure the system for either more conservative or more aggressive processing strategies.
watch:
  # number of recent events to consider when calculating processing rates
  rate_window_size: 10
  # sparsity factor for file processing
  # a higher value means less frequent processing
  # 1.0 means process every file, can not be less than 1.0
  sparsity_factor: 3.0
  # initial processing interval for file processing, means process one file
  # with plugins for every N files
  # but will be adjusted automatically based on the processing rate
  # 12 means processing one file every 12 screenshots generated
  processing_interval: 12
If you want every screenshot file to be processed, you can configure the settings as follows:
# A watch config like this means process every file with plugins at the beginning
# but if the processing rate is slower than file generated, the processing interval
# will be increased automatically
watch:
  rate_window_size: 10
  sparsity_factor: 1.0
  processing_interval: 1
Remember to do memos stop && memos start to make the new config work.
Idle Processing Strategy
Pensieve implements an intelligent idle processing strategy to handle skipped files during system idle time. This helps ensure all screenshots are eventually processed while minimizing impact on system performance during active use.
Idle Detection and Processing
- The system enters idle state after 5 minutes of no new screenshot activity
- During idle state, Pensieve will attempt to process previously skipped files if:
- The system is not running on battery power - The current time falls within the configured processing window - There are skipped files pending processing
Configuration
The idle processing behavior can be customized in ~/.memos/config.yaml:
watch:
  # seconds before marking state as idle
  idle_timeout: 300
  # time interval for processing skipped files
  # format: ["HH:MM", "HH:MM"]
idle_process_interval: ["00:00", "07:00"]idle_timeout: How long (in seconds) the system should wait without activity before entering idle stateidle_process_interval: The time window during which skipped files can be processed
- Format is ["HH:MM", "HH:MM"] in 24-hour time - The interval can cross midnight (e.g., ["23:00", "07:00"] is valid) - For intervals crossing midnight, start time must be after 12:00 to avoid ambiguity
This strategy ensures that:
- System resources are primarily available for active use during working hours
- Background processing occurs during off-hours
- Battery life is preserved by avoiding processing while on battery power
Remember to do memos stop && memos start to make any configuration changes take effect.
Privacy and Security
During the development of Pensieve, I closely followed the progress of similar products, especially Rewind and Windows Recall. I greatly appreciate their product philosophy, but they do not do enough in terms of privacy protection, which is a concern for many users (or potential users). Recording the screen of a personal computer may expose extremely sensitive private data, such as bank accounts, passwords, chat records, etc. Therefore, ensuring that data storage and processing are completely controlled by the user to prevent data leakage is particularly important.
The advantages of Pensieve are:
- The code is completely open-source and easy-to-understand Python code, allowing anyone to review the code to ensure there are no backdoors.
- Data is completely localized, all data is stored locally, and data processing is entirely controlled by the user. Data will be stored in the user's
~/.memosdirectory. - Easy to uninstall. If you no longer use Pensieve, you can close the program with
memos stop && memos disable, then uninstall it withpip uninstall memos, and finally delete the~/.memosdirectory to clean up all databases and screenshot data. - Data processing is entirely controlled by the user. Pensieve is an independent project, and the machine learning models used (including VLM and embedding models) are chosen by the user. Due to Pensieve' operating mode, using smaller models can also achieve good results.
Of course, there is still room for improvement in terms of privacy, and contributions are welcome to make Pensieve better.
Other Noteworthy Content
About Storage Space
Pensieve records the screen every 5 seconds and saves the original screenshots in the ~/.memos/screenshots directory. Storage space usage mainly depends on the following factors:
- Screenshot Data:
- Single screenshot size: about 40-400KB (depending on screen resolution and display complexity) - Daily data volume: about 400MB (based on 10 hours of usage, single screen 2560x1440 resolution) - Multi-screen usage: data volume increases with the number of screens - Monthly estimate: about 8GB based on 20 working days
Screenshots are deduplicated. If the content of consecutive screenshots does not change much, only one screenshot will be retained. The deduplication mechanism can significantly reduce storage usage in scenarios where content does not change frequently (such as reading, document editing, etc.).
- Database Space:
- SQLite database size depends on the number of indexed screenshots - Reference value: about 2.2GB of storage space after indexing 100,000 screenshots
About Power Consumption
Pensieve requires two compute-intensive tasks by default:
- One is the OCR task, used to extract text from screenshots
- The other is the embedding task, used to extract semantic information and build vector indices
Resource Usage
- OCR Task: Executed using the CPU, and optimized to select the OCR engine based on different operating systems to minimize CPU usage
- Embedding Task: Intelligently selects the computing device
- NVIDIA GPU devices prioritize using the GPU - Mac devices prioritize using Metal GPU - Other devices use the CPU
Performance Optimization Strategy
To avoid affecting users' daily use, Pensieve has adopted the following optimization measures:
- Dynamically adjust the indexing frequency, adapting to system processing speed
- Automatically reduce processing frequency when on battery power to save power
Development Guide
Peeling the First Layer of the Onion
In fact, after Pensieve starts, it runs three programs:
memos servestarts the web servicememos recordstarts the screenshot recording programmemos watchlistens to the image events generated bymemos recordand dynamically submits indexing requests to the server based on actual processing speed
Therefore, if you are a developer or want to see the logs of the entire project running more clearly, you can use these three commands to run each part in the foreground instead of the memos enable && memos start command.